Angle of Louis: The Critical Guide to Mastering Intercostal Space Palpation
Angle of Louis: The Critical Guide to Mastering Intercostal Space Palpation
In clinical medicine, identifying and navigating the intricate intercostal spaces is essential for diagnosing respiratory conditions, performing chest examinations, and guiding interventions—yet precision demands more than basic anatomy knowledge. The Angle of Louis, a subtle yet pivotal anatomical landmark, serves as the cornerstone for locating these intercostal spaces with confidence and accuracy. Used by seasoned clinicians alike, this angle transforms the often-haphazard task of intercostal assessment into a reliable, repeatable skill.
Mastering this technique unlocks deeper insight into thoracic health and sharpens diagnostic precision.
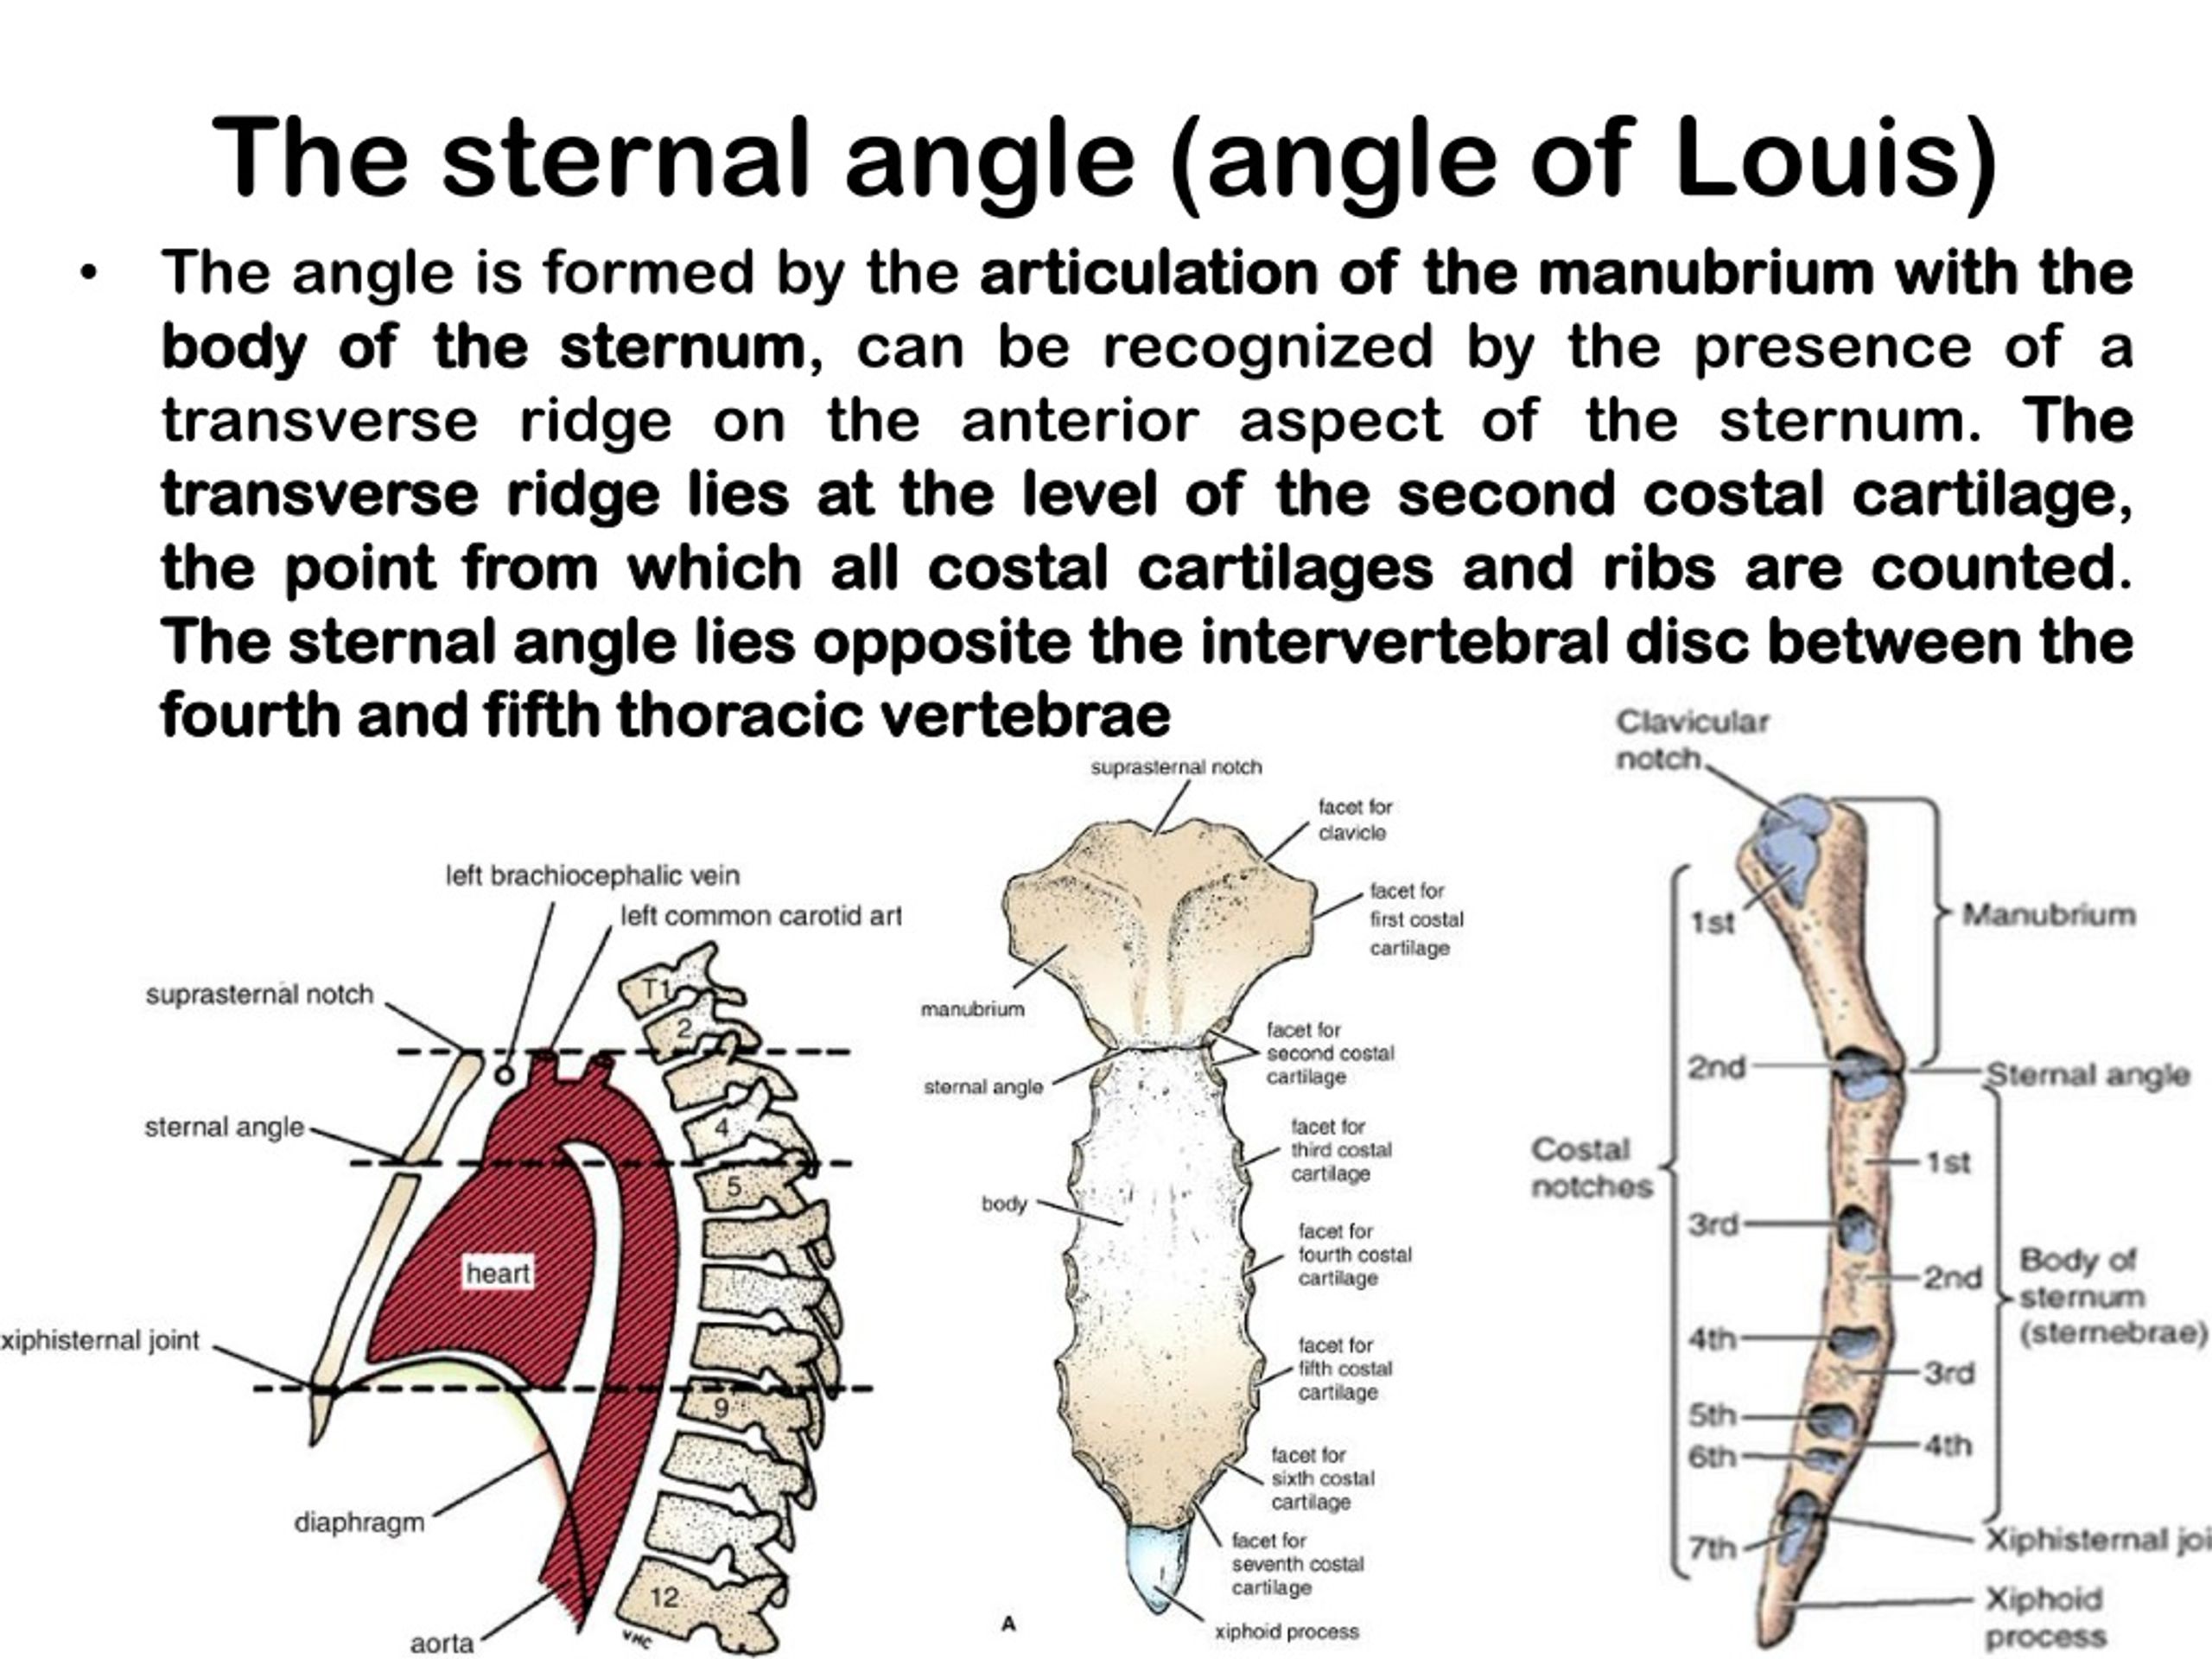
What Is the Angle of Louis—and Why It Matters in Thoracic Palpation
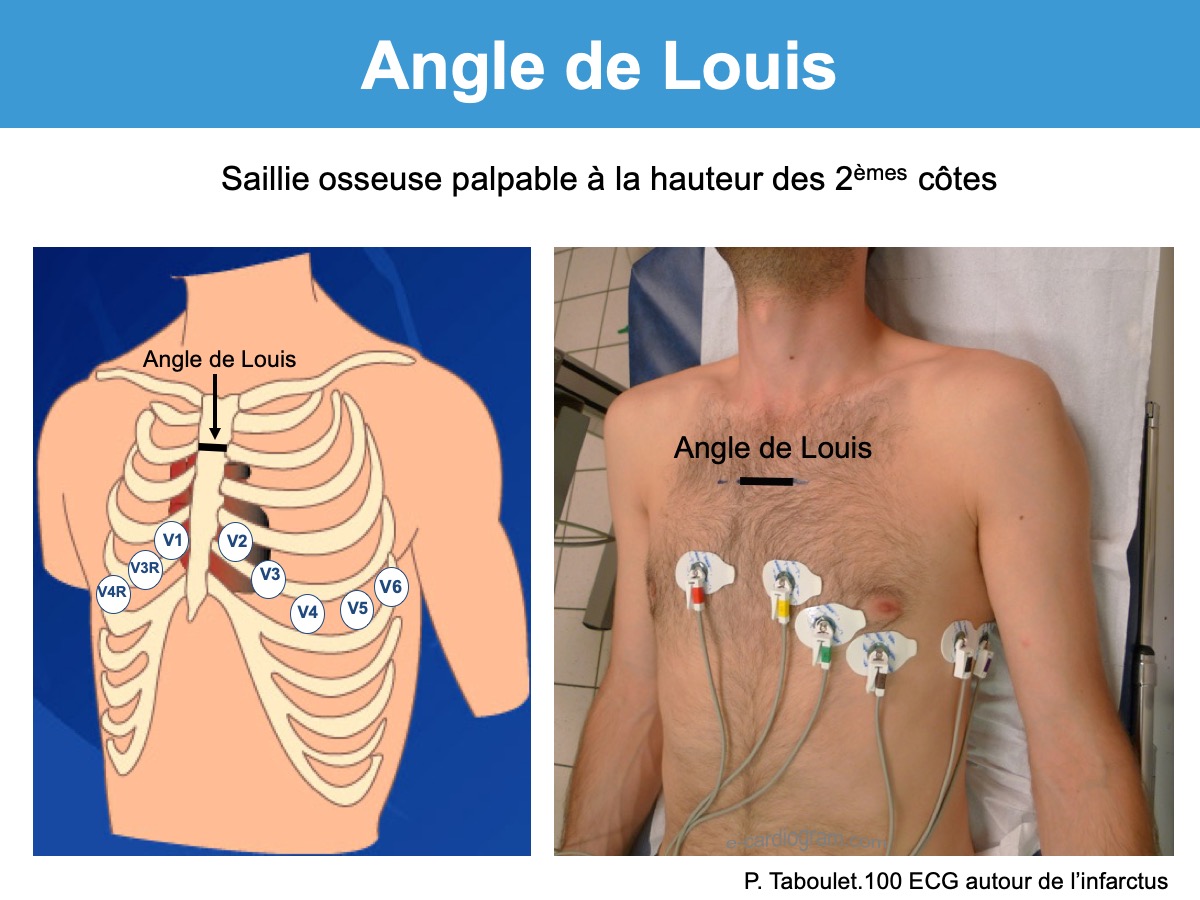
The Angle of Louis, also known as the Louis’ angle, denotes the anatomical junction between the seventh thoracic vertebra (T7) and the first or second ribs, roughly located at the midclavicular line on the anterior chest wall. This subtle angulation—typically forming a 15 to 20-degree inclination when viewed from the lateral perspective—orchestrates the spatial relationship critical for identifying intercostal spaces between ribs 4 and 5, and 5 and 6 in adults. Its significance lies in providing a consistent reference point amid the complex, varying topography of the ribcage.
For medical professionals, "seeing" not just the ribs but understanding their precise angulation means dramatically improving diagnostic accuracy in respiratory assessment.
Clinically, palpation becomes far more predictable with the Angle of Louis as a guide. Rather than relying on vague tactile cues, practitioners use this landmark to pinpoint the precise location of intercostal spaces—critical for procedures like fluid aspiration, chest tube placement, or inspection during physical exams. The angle acts as a compass: once palpated, clinicians can systematically explore the ribcage, knowing exactly which ribs form the target space.
As Dr. Elena Márquez, a specialist in thoracic medicine, explains: “The Angle of Louis isn’t just a point on the chest; it’s a gateway to understanding the entire intercostal region. Mastery of its identifying path means fewer missed spaces and fewer errors.”
The Anatomy Beneath: Mapping the Intercostal Spaces Relative to Louis’ Angle
Understanding intercostal spaces begins with recognizing their placement in relation to the ribmaking structure and the Angle of Louis.
Intercostal spaces lie between adjacent true ribs—excluding the floating ribs—and are grouped into upper (4–6), middle (5–5), and lower (5–6) zones. The angle forms at T7, approximately aligned with the midpoint of the costal margin along the midclavicular line, where the ribs tilt slightly inward and downward. This tilt creates a natural pathway: touching the angle establishes early contact, with fingers then gliding lateral to lateral across rib 4 through 6.
The 15–20-degree inclination ensures that palpation moves from medial to lateral across distinct spaces—no guessing, no guesswork—just anatomical logic.
- Rib 4–5: Located just below the angle, accessible via lateral palpation just lateral to T7.
- Rib 5–6: Situated further lateral, forming the transitional zone where the ribbodies angle toward the costal margin.
- Rib 5–6 Approaches: Here, the slight narrowing at the angle sharpens tactile awareness, guiding careful exploration of vital intercostal sites.
Imaging studies confirm the angle’s positional reliability—CT scans and fluoroscopy show consistent alignment between the T7 vertebral level and the first or second rib’s anterior border at this midclavicular juncture. This reproducibility ensures that clinicians across training levels can confidently use Louis’ angle to navigate, even in patients with atypical thoracic anatomy due to obesity, scoliosis, or chronic lung disease.
Step-by-Step Technique: Using the Angle of Louis to Identify Intercostal Spaces
To effectively locate intercostal spaces, professionals follow a structured, hands-on approach rooted in the Angle of Louis: 1. Begin by positioning the patient in supine or semi-upright, ensuring relaxed breathing.
2. Palpate gently along the midclavicular line, feeling for the smooth transition at T7—the elevated bony prominence marking the angle. 3.
From this point, glide the fingers laterally between adjacent ribs, palpating only the space between ipsilateral ribs 4–5 and 5–6—never overlapping or skipping zones. 4. Apply consistent, light pressure; discomfort or pain signals off-target contact, prompting recalibration using the angle as reference.
5. Validate tactile feedback with respiratory cues—expiry often shows greater space definition due to reduced intrathoracic pressure. This method, when practiced systematically, turns subjective palpation into a repeatable skill vital for accurate assessment.
Multiple training modules emphasize precise execution: “Begin at Louis’ angle.
Stay lateral. Use your index and middle fingers. Feel for continuity, not just bony contacts,” advises Dr.
James Lin, a clinical instructor specializing in emergency medicine. “Memorizing the angle’s location reduces cognitive load. Every time you palpate, you’re referencing a known landmark—like reading a map.”
Challenges and Pitfalls in Palpating Intercostal Spaces Near the Angle
Despite its utility, using the Angle of Louis effectively demands awareness of anatomical variability and common challenges.
Patients with thick chest walls, muscular hypertrophy, or obesity may obscure the angle, making landmark identification harder. Similarly, conditions like kyphosis, scoliosis, or prior thoracic surgery alter rib alignment, shifting the apparent position of Louis’ angle. Misjudging this subtle landmark risks palpating incorrect spaces—potentially missing fluid collections, lesions, or air during aspiration.
To mitigate, experts recommend combining the angle with other cues: observing the costal margin’s curvature, noting rib curvature patterns, and matching palpation to respiratory phases. “The angle guides, but clinical judgment defines,” warns Dr. Márquez.
“Experience sharpens your sensitivity—especially when anatomy deviates.”
Advanced Applications: From Diagnosis to Intervention
The Angle of Louis transcends basic palpation, becoming indispensable in complex clinical scenarios. In emergency settings, rapid identification of intercostal spaces using Louis’ angle enables safe chest tube insertion—critical for pneumothorax or hemothorax management. Radiologists rely on it to correlate physical exam findings with imaging, validating fluid or pneumothorax locations.
Researchers studying respiratory mechanics use the angle to standardize measurements across populations, improving diagnostic consistency. Moreover, in pediatric and geriatric care—where thoracic anatomy differs markedly—this landmark provides a reliable reference that adapts to variation. “It’s not just about finding spaces,” notes Dr.
Lin. “It’s about precision under pressure, ensuring every intervention is anchored in anatomical certainty.”
Mastery of the Angle of Louis transforms intercostal space identification from instinctive guesswork into a science-backed practice. It empowers clinicians to locate, evaluate, and treat with confidence across diverse patient profiles.
As medical imaging advances and bedside diagnostics evolve, this enduring anatomical principle remains vital—anchoring expertise in a landmark as clear and reliable as Louis’ angle.


Related Post

Kristi McElland: Survival, Strength, and Legacy Woven in the Wildesses – A Family Forged in Resilience

At 37, Ben Garfield Stands as a Beacon of Youthful Energy in Sports Leadership
Sierra Pippen: The Architect of Precision in Contemporary Art Criticism

Jermaine Fowler’s Marriage Drained by Public Scrutiny and Personal Secrets


